.

01242 964 444  CONTACT US

0Item(s)

You have no items in your shopping bag.

Product was successfully added to your shopping cart.

summer

  • Stay Sun Safe

    Now that we are officially into the summer months and the sun has finally decided to make an appearance, we all know the importance of protecting our skin and how to keep it sun safe. We all invest in SPF, scrubs and moisturisers to help maintain the best looking skin possible, but we often forget about protecting our hair and scalp. Follow my quick guide to keep your hair looking, feeling and behaving at it’s best throughout the summer.

    Step 1. Protect

    Even if you’re not on spending your whole summer laying on the beach, your hair is still vulnerable to UV damage. UV rays act on the hair much like bleach and as a result can lighten the colour. If you’ve spent your hard earned cash perfecting your shade, that can be frustrating. UV rays can also damage the proteins in your hair, causing breakage and a brittle hair shaft. To help protect against this, spritz a sun protective spray through your mid-lengths and ends before stepping outside. For the convenience, and the gorgeous smell, I opt for L’Oreal Solar Defense Spray 125ml.

    Step 2. Avoid Water Damage

    Whether you’ll be dipping in a swimming pool filled with chlorine, or keeping it more natural with salt water at the beach, these water types can wreak havoc on your hair. Salt and chlorine can be very drying and with the added bonus of sun exposure added to the mix, it can lead to more than a few bad hair days. Now, I’m going to share with you the best piece of hair related advice I’ve ever been given. Your hair is like a sponge…it will absorb water, but only a certain amount. The trick is, to make it absorb the right type of water. Rinse your hair in a poolside shower BEFORE you get in the water. It can only absorb so much and the fact that your hair is already wet will act as a barrier to the salt or chlorine from being absorbed. Genius.

    Step 3. Scalp Safety

    Your scalp can burn, just like your skin, so it’s important to protect it as much as possible. Using the right shampoo before you step into the sun can help protect your scalp and provide UV protection. Try L’Oreal Solar Sublime Shampoo 250ml and EVO Ritual Salvation Care Conditioner 300ml

    Step 4: Fight Frizz

    We all know that sun + heat + humidity = frizz. Fact. Don’t stress though, there is a solution. Use a weekly conditioning treatment to strengthen your hair, close the cuticle and restore moisture. This will make it more manageable and less likely to frizz. Redken Extreme Megamask 200ml is a great option. Just leave on for 3-5 minutes after shampooing every 3 days and you’ll be set. When you are out in humid weather, make sure to apply a product that will create a barrier between your hair and the moisture in the air. I always recommend L’Oreal Tecni Art Liss Control + Serum 50ml.

    Have you got any sun-safe tips to share? Pop them in the comments below. I’d love to hear them.

    xoxo

  • Can’t stand the heat?

    With the summer months approaching, it can’t just be me who always looks to change up the way I style my hair. I’m not sure what it is about summer, but I always feel the need to tone down my beauty routine and take it back to basics. I opt for a CC or BB cream instead of my usual foundation, I’ll make sure to moisturise my body for a change and I always try to give my hair a break from the constant styling and heat that I expose it to daily. That said, I still want to look good and feel put together, not just like I’ve made no effort at all. If I’m honest though, I usually cave and go back to my heated styling tools after a day as my hair just won’t air-dry without making me look like I’ve been dragged through a hedge. This year things are different though as I’ve got a secret weapon. Enter Redken’s new No Blow Dry Stylers. 

    Whether you just don’t have enough time or energy to heat style your hair, or like me you want to take a break, Redken’s No Blowdry Stylers offer the ability to achieve a frizz-controlled style on the go. Like me you might be feeling a bit sceptical and swear you’ve heard this all before, but what makes Redken No Blow Dry different from other leave-in’s is Redken’s Air-Tex Technology; a system of flexible polymers for control and movement and quick dry polymers that help speed up drying time. The range consists of three creams, Airy Cream for fine hair, Just Right Cream for medium hair and Bossy Cream for coarse hair types, so there really is a version for everyone. Redken’s No Blow Dry creates an effortless style which both look great and feels great, plus it smells amazing and keeps that ‘just washed’ hair smell going for longer. I’m sold.

    The secret with these products is to know how best to use them to help you create your ideal no heat styler. Here’s a few of my tips and tricks to help:

    1. For loose beach waves

    Apply No Blow Dry to damp hair. Create one loose braid and let your hair air-dry. Undo braid, and shake out hair to perfectly waved tendrils.

    1. For tighter beach waves

    Apply No Blow Dry then create two or more braids, depending on your hair thickness. Let your hair air-dry, then undo braids and shake out.

    1. For a soft, face-framing bend

    Apply No Blow Dry then clip your hair behind your ears and allow it to air-dry. Unclip, then gently tousle.

    1. For bouncy waves with root volume

    Apply No Blow Dry then twist hair into a high topknot, and allow to air-dry. Undo the topknot and gently brush through.

    1. For enhanced natural texture

    Apply No Blow Dry then scrunch hair and allow it to air-dry.

    1. For defined natural curls

    Apply No Blow Dry then gently twist curls into shape using fingers and allow to air-dry.

    Have you tried the new #NBD stylers yet? I’d love to hear your tips on how best to use them. Get sharing!

    xoxo

  • How to: Fishtail Plait


    plait
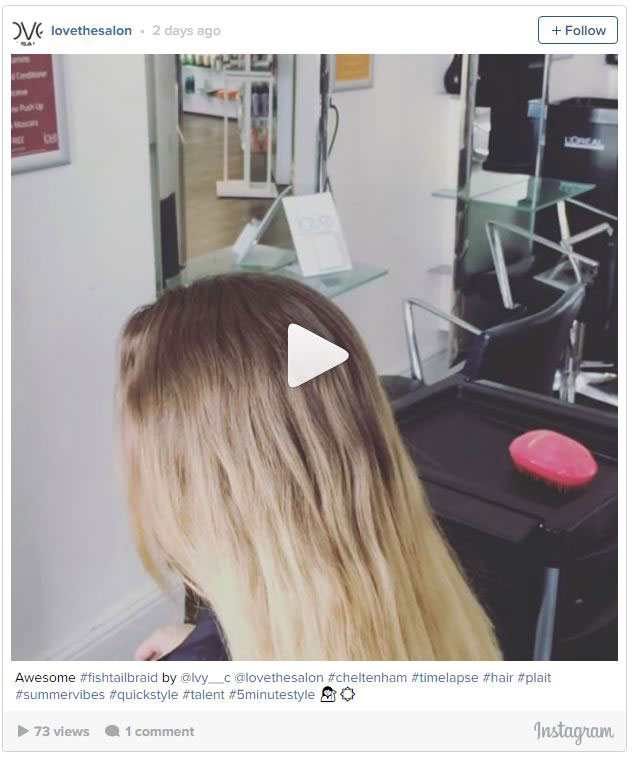
If I had a pound for every time a client asked me to teach them to do a fishtail plait, I’d be a very rich stylist that’s for sure! It has got to be the most requested quick-style of the moment, but it can be a little intimidating for those new to up-dos. Trust me though, braids and plaits are some of the easiest styles to get right once you’ve had some practice. I thought I’d give you a quick tutorial of how you can achieve this simple but gorgeous look at home, in just 5 steps.

    Step 1:

    Create a Ponytail. To begin, gather your hair into a ponytail at the nape of your neck. Use a throwaway elastic band - one that you can snip away with scissors at the end.

    Step 2:

    Divide Your Ponytail. Next, split your ponytail evenly into two sections. Unlike the classic plait, a fishtail plait only requires two sections.

    Step 3:

    Begin Weaving. Use your finger to separate a small section of your hair from the outer edge near the elastic and cross it over to the opposite side (overlapping just like you would if you were doing a standard plait). Re-grip your hair to tighten plait, still holding two sections. Repeat with a small section from the other side.

    Step 4:

    Maintain Evenness. Continue overlapping pieces from both sides of your ponytail, all the way down to your ends. Be sure to pull small sections from underneath to cross over, and try to grab the same size (about a half inch) sections from each side.

    Step 5:

    Finish Your Look. Once you've woven your hair down to the ends, secure the fishtail plait with another elastic band. Then, use scissors to carefully cut out the elastic at the base of your ponytail. Finish your fishtail braid by gently tugging on your braid with your fingers to loosen it for an effortless look.

    It really is that simple.

    Still not feeling confident? Take a look at the time-lapse video from the salon to see a demo of how us pros do it!

    video

    xoxo

Items 4 to 6 of 12 total

  1. 1
  2. 2
  3. 3
  4. 4